How to Tie Crawler Harnesses
by Mike Giamportone
If you like to save money (who doesn't?) while increasing
your odds at catching more walleye (who wouldn't?), tying
your own crawler harnesses is something you probably should
be doing. It's not hard or expensive, and does not take much
time. A homemade harness can be assembled in less than two
minutes for under 50 cents! Many fishermen and women find
it enjoyable creating their own custom, very productive rigs,
that could not be bought anywhere at any price. This article
will explain how to tie crawler harnesses, discuss the different
types of components as well as where to buy them, and how
or why you might customize your rigs to improve your walleye
fishing. After reading this you are going to ask yourself
"Why haven't I done this before?" If you do tie your own rigs,
this article may give you some time or money saving tips.
Even though called crawler harnesses, worms are not the only
bait used on these rigs. Natural minnows, leeches, as well
as plastic baits of all kinds can be productive when presented
with crawler harnesses. These rigs require very few components
that you may already have in your tackle box. Some line, a
hook or two, beads, a spinner blade, and a clevis is all it
takes.
Begin by gathering the necessary components. If not exact,
similar components will serve to teach the basic steps. The
following can be picked up from most tackle shops or purchased
from any fishing catalog:
Some 12 to 30-lb. monofilament line
A long shank or live bait hook
Six each - 6mm Beads
A Spinner Blade
A Size #2 to #4 Folded (spinner blade) Clevis
Find some space on a table or workbench where you can be comfortable.
Sit if you like. As far as tools all that is really needed is
nail clippers or scissors to cut the line. Turn on the radio
or your favorite walleye fishing show since total concentration
will not be required. Set out within your reach the components
listed above. Cut about a 5-foot piece of line. You will not
be able to tie a hook the way explained here with one end of
the line still connected to a spool.
TYING YOUR FIRST CRAWLER HARNESS
Hold the hook in one hand with the eyelet towards your other
hand. Without letting go of the hook, thread one to two inches
of line up through the eye and pinch the line firmly against
the hook's shank. Remain holding the line and hook this way
(closer to the hook point than eyelet).

With your free hand grab the loose line close the eye. Start
wrapping the line around the shank as close as you can with
each successive wrap going away from the eye towards the hook
point. Wrap the line six to eight times while keeping tension
on the previous wrap. Then with a free finger from the hand
holding the hook, press on the knot just enough so it does
not come unraveled.
Thread the line through the eye opposite the way it came
from, i.e.: If you began your knot by threading the line UP
through the eye, finish by threading the line DOWN through
the eye. Pull the line tight while not allowing the knot to
loosen. If needed, slide the knot towards the eye. That's
it, you have a perfectly tied hook!
Depending on the eyelet of the hook used, you may have difficulty
getting the line to wrap around the shank at first. Don't
worry that's normal until you do it a few times. Then it becomes
second nature. Here are a few different methods you might
try if the line won't wrap. Pull the line a little tighter
while wrapping. Try exaggerating the first wrap by pulling
it halfway down the shank and fairly taut for the first wrap.
Another technique is to press a free finger on the end of
the eye while tying the first wrap.
If your hook's knot does not look proper or to your liking,
take it apart and practice as many times as you like. Cut
the line about 1/2" above the hook and reuse the untwisted
line over and over until you are satisfied. The knot is untied
by pulling the line back through the eye and unwinding until
free.
Slip 5 beads down the line towards the hook. Place the clevis
through the hole in the spinner blade with both clevis holes
on the cupped (concave) side of the blade. Thread the line
up through both clevis holes. The cupped side of the blade
must be towards line and hole in blade should be at the top
away from hook. Always fasten a blade with a clevis. Without
a clevis the spinning blade will cut your line.
Add the last bead above the spinner blade for some additional
sound attraction. Double over the last 2 inches of your line
and tie it with an overhand knot to create a loop. Try to
make a loop about 1/2" to 1" in diameter and pull knot tight.
Trim the excess line from the loop and hook. Leave approximately
1/4" of line past the knots so they can tighten as needed
without failing.
CRAWLER HARNESS MODIFICATIONS
Multiple Hooks:
So fisherman can use a whole worm, many crawler harnesses
use multiple hooks. You probably think that making harnesses
with multiple hooks must be a whole lot harder. Nothing could
be farther from the truth! Adding additional hooks is just
as easy as the first. Tie the first hook as usual. Slide the
second hook down and space it exactly where you want it. Be
sure the hook is orientated the same way as the first hook.
Pinch the line and shank of the additional hook just as you
did with the first. Wrap the free line around the shank near
the eye. This time thread the line through the eye the same
way it came from (should be the bottom). Viola' a harness
with a second hook.
Additional hooks could be added in the same way. Second and
third hooks are very popular with shorter shank hooks like
"walleye" or "octopus" hooks but more than one hook is not
recommended for long shank hooks like Aberdeen.
Barrel Swivels:
The weakest part of your crawler harness will be line in the
overhand knot loop you tied to finish your rig. Imagine if
you connect the loop directly to a snap clevis, the entire
force will be pulled in one small spot of the line.
Adding a barrel swivel here will do two things for you. Instead
of focusing all the force in one small part of the line, it
spreads the force to at least two spots.
Barrel swivels will also protect the harness from damage.
When retrieving your line too quickly, harnesses tend to twist,
causing the line to coil and ruining the harness. Even bottom
bouncers that have snap swivels allow this to occur too frequently.
A barrel swivel on the end of a crawler harness will eliminate
twisting on fast retrieves.
Attach the barrel swivel by sliding the crawler harness loop
through one end of a barrel swivel up to the overhand knot.
Then slip the loop over the swivel and pull it down to the
bottom of the swivel to tighten. Size 10 barrel swivels are
recommended.
Multiple Blades and Number of Beads:
Four or five beads above the hook and one spinner blade is
the most common setup. Beads are supposed to make rattling
or a ticking noise while the spinning blades give off vibration,
both to attract walleye. The number of beads can be changed
to your preference. Be sure to keep the blade from getting
too close to hook point and interfering with the hook set.
It's OK though for the hook to bang against the shank of the
hook. A bead above the spinner blade again is a matter of
choice. If desired, a second spinning blade can be added for
increased vibration simply by adding four to five more beads
above your first spinner blade. Then add the second clevis
and blade before tying the overhand loop.
Floating Crawler Harnesses:
Adding styrofoam or cork floats in place of beads reduces
snags by keeping hooks from dragging on the bottom and over
most timber especially at slower speeds. The trade off may
be losing the inviting sound the rattling hard plastic beads
give off. While ball and oval shaped floats have been the
industry standard for quite sometime, new peg-style floats
seem to be productive and a favorite. Peg floats come in two
sizes. Use the large pegs (11/4") for most blades and the
small ones (3/4") for hatchet and smaller blades. Metal-colored
peg floats that match blade finishes are now available and
highly recommended. If using any type of float in place of
beads, add at least one small or regular bead on both sides
of the float. This prevents the hook and clevis from digging
into the float and ensures the blade spins freely .
Clevises:
Folded or stirrup clevises have been used for many years successfully
to fasten spinner blades to the line. Both are cheap but folded
clevises have a little more area in contact with the line
and are thought to prevent cutting more than stirrup clevises.
Something relatively new on the scene is quick-change clevises.
These plastic clevises allow you to rapidly change the spinner
blade to whatever pattern or color you want without having
to change the entire crawler harness. When quick-change clevises
first came out there was the occasional difficulty throwing
blades but that problem has since been addressed. Because
they contact more area on your harness line and are a bit
larger, it is thought quick-change clevises may increase drag
and spin a bit slower. Another consideration is changing the
blade does not change the color of your beads. Some people
feel bead color to be less of a factor than blades in catching
walleye so they use is quick-change clevises exclusively and
change harnesses when bead color does require a change.
Blade Color, Pattern, Shape, etc.:
There is too much about spinner blades to be covered in depth
here. Some basics are offered that will help you decide what
to tie on and when to use them.
Generally, the bigger the blade the slower it spins and the
louder it vibrates. Loud and slow is great for stained water
and big walleye. Narrow blades (like Indiana and Willow) spin
easier at slow speeds and emit a higher frequency than the
rounder (Colorado) blades. Spinning blades also give off a
flash like fleeing baitfish. Start out with size #4 Colorado
blades and experiment from there.
Hammered finishes appear as fish scales and give off a different
flash than smooth blades. Since there is an endless variety
of finishes, where do you start? Try metal finishes for very
clear water. Nickel, Brass, Copper, and Gold blades seem to
be the most productive in clear water. For stained water something
with chartreuse definitely outperforms all others. But nickel
will still catch fish. Try different blades or harnesses and
let the walleye tell you what they want. Don't marry one color
or pattern and stick with it for too long if it is not producing.
Out on the water once you find a color or blade combination
catching more walleye than others, switch your other rods
to similar combinations until conditions (light, water clarity,
waves action, or wind) change.
Hatchet blades are becoming more popular as fishermen put
more fish in the boat and become confident in their catching
ability. Their unique shape gives off yet another type of
flash and vibration that works well.
If you want to know what crawler harnesses are popular in
your area, go to the local bait stores and see what they sell
the most of. Ask the salesperson what they prefer to use and
why. Then save yourself some money by tying your own.
Bead Type, Color, and Size:
While beads don't have the endless variety as blades do, there
still is quite a selection. Size #6 plastic beads are common
for many harnesses. Among the alternatives that could be utilized
are glass beads. They are more expensive but louder and heavier
than plastic beads. Glow in the dark beads work well at night,
dusk, and dawn. Faceted beads (beads with flat spots on all
sides) are said to flash more light in the water. If you don't
like threading on all those small holed beads onto that fairly
fine line, there are stacks of five beads sold together for
you. Orange and red are supposed to be the most visible color
for many fish, while chartreuse beads are popular for stained
water. Again when starting out, visit the local tackle stores
and see what is working for fishermen in your area before
buying a big assortment of beads.
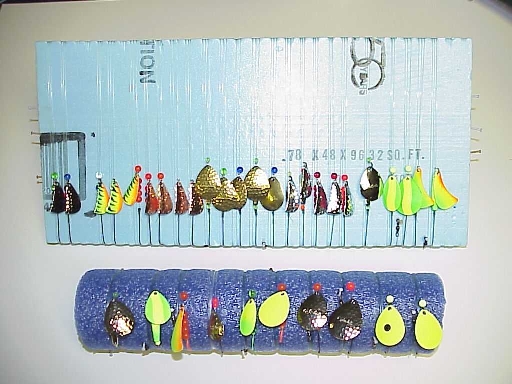
STORAGE SOLUTIONS
So you made your first crawler harness. Now what do you do
with it? When you buy rigs, they come in clear plastic or
small zip lock bags. You can purchase the same bags from the
sources that supply harness components but they are despised
for the tangles that usually result when uncoiling the the
harnesses. Rectangle or round crawler harness holders area
available but take up considerable space and are not cheap.
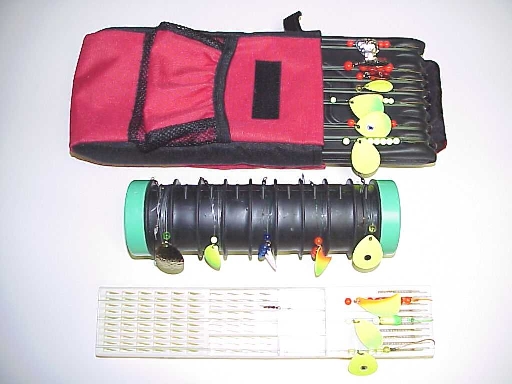
To hold a lot of harnesses in a small space, get a better
view of all the different harnesses you have available, and
save money, you might try homemade crawler harness storage.
Visit the lumberyard or pickup scraps from construction sites
of 1/2" or 3/4" thick house insulation (sheet foam). Cut the
foam into manageable size pieces. Stick harness hooks in one
edge of the foam and wrap the line neatly around and hold
the barrel swivel in place with small nails. When you remove
the nails stick them in the unused side of the foam for later
use. Those cheap pool fun noodles (~3" diameter, 5' long soft
foam) cut in one foot lengths also make ideal holders.
SPEEDING THINGS UP
Even though it doesn't take very long to make a crawler harnesses,
if you can save 30 seconds on each one when assembling a couple
dozen, it makes a difference. Here are a few things you can
do to speed up the process.
Once you find the length of harness you prefer, mark the
bench or table for cutting the line the same each time. This
guarantees all harnesses to be the same length and is real
impressive looking at a homemade harness holder when all the
nails holding the end of the rigs are in a fairly straight
line. No one will believe you tied them all by hand.
When you are proficient at making crawler harnesses and only
then, you can eliminate having to trim excess line at both
ends. The following suggestions make tying the knots a little
tougher and should never be tried until you are proficient
at making harnesses. First, try to put no more line through
the eye of the hook than you need to tie over. Second, don't
fold as much line over when tying the overhand loop and slide
the knot within 1/4" of the end of the line as you snug the
knot up. Both eliminate trimming line and saves a little time
for each rig.
Use segmented plastic storage boxes for your components to
neatly hold all crawler harness components. This is almost
a must. It definitely speeds assembly and helps keep track
of what you may be getting low on.
SUGGESTED CRAWLER HARNESS MODIFICATIONS FOR LOWER LAKE
HURON AND ST. CLAIR RIVER WALLEYE
Drifting and trolling are some of the most popular methods
of walleye fishing in the lower Lake Huron and the St. Clair
River. While structure provides current breaks, attracts and
holds walleye, it also supplies plenty of snags. Tweaking
your equipment keeps lines in the water as much as possible
with a minimum of lost time and tackle. You can't catch fish
when your line is not in the water.
Since tangle-free bottom bouncer (sinkers) are preferred
and at a little over buck each, 24 to 30 lb. Spiderline Fusion
or Fireline is spooled on my reels. Sinkers are the last tackle
I want to lose. Not only am I cheap but retying snap swivels
on my main line and finding another bottom bouncer definitely
takes too much time from fishing.
When I tie crawler harnesses 1/0 (one-aught) bronze Aberdeen
hooks are used. They absolutely keep all lines in the water
more. Releasing a snag can be almost impossible in the St.
Clair River current. I have seen it done at a large expense
to time and motor noise. Better yet, these Aberdeen hooks
are light enough to straighten just enough to release from
a snag yet strong enough not to straighten out with a big
fish on. So if you get a snag, all you have to do is pull
your line up, bend the tip of the hook back into shape, slap
some bait on and you are back in business.
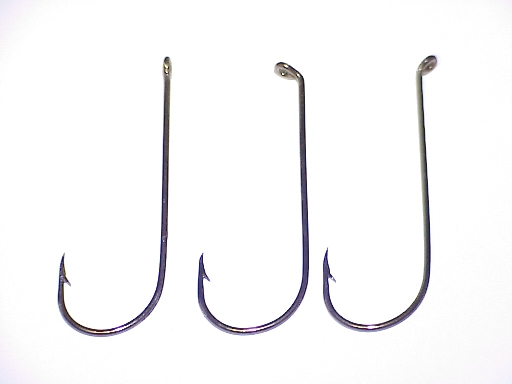
Aberdeen hooks only come with straight eyelets. Before tying
I offset all the eyelets in or out like most "walleye" hooks
with some pliers. This makes them sit straight once tied and
sets the hook better in the corner of the mouth.
The long shanks are preferred since they hold 1/2 to 3/4
of a crawler nicely. I have found that part of a crawler releases
more scent than a whole one. In fact, slightly mangled crawlers
as long as they stay on the hook work best! Threading one
half of the shortened crawler on an Aberdeen hook with a little
bit right over the knot holds it in a fairly straight line
and keeps it there even when going through some seaweed. Just
gobbing some worm on is never as productive.
Single hook harnesses definitely snag 1/2 as much as multiple
hook rigs. A note here about Aberdeen hooks. Do not purchase
Brass Aberdeen hooks. They break very easy and are not recommended
for crawler harnesses. While bending the eye of Aberdeen hooks,
you may consider bending the hook tip to one side slightly
to make the hook set deeper or at an angle in the corner of
the mouth. But this has been found to cause more snags.
Many store bought harnesses use 30-lbs test line. For homemade
harnesses 17-lb. Trilene XT (extra tough) is preferred because
it resists abrasion yet will break before the main line going
to the bottom bouncer will. I am willing to sacrifice any
one of my crawler harnesses on a snag in the few cases the
hook does not straighten and release before losing a bottom
bouncer. Again this keeps the lines in the water more and
saves money.
Harness length can be experimented with. In very clear water
and sunny days, long (6 to 20 feet) harnesses can be a little
more productive when the boat is moving slowly. But when the
current or boat moves faster, or in stained water, the longer
leads are not usually worth the trouble. Just let out more
main line to get the bait away from the boat. I do not think
bottom bouncers spook the fish so I now make all my harnesses
48" long (finished length). This not only makes storing harnesses
easier, but also allows harnesses to remain on the rods when
moving the boat in or out of the water.
As you can see there is a pecking order for snags. Bend hook
first, break crawler harness line next, and if you monitor
the condition of your main line you will never break it and
lose a bottom bouncer. If you seem to be getting a lot of
snags, there are a few other things you can do to prevent
them. Speed up your boat. Try trolling or drifting a little
faster. Drift bags (a.k.a. sea anchors) can speed a boat up
when the wind is blowing against the current. Use two drift
bags if necessary. Use floats on your crawler harnesses to
keep the hook up off the river floor. As you let line out,
do it slowly. Keep your rig swimming so your harness does
not just fall to the bottom and immediately snag. When you
do get a snag, don't hold on for your life and break something.
First try to release your line quickly until fully limp. Then
reel in. Many times this will release the hook or blade from
the snag. Be sure to check the condition of your harness,
hook sharpness, and re-bait if necessary.
You should try any technique that saves you money while increasing
your odds at limiting out your favorite fish. Tying your own
crawler harnesses is definitely one of those techniques. Adding
custom crawler harnesses to your arsenal can make the difference
between a good day and a bad day on the water
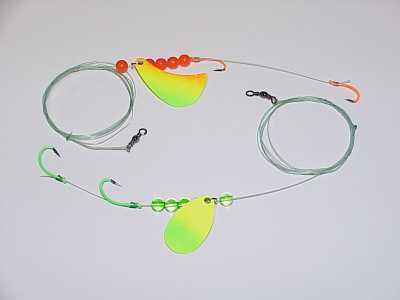
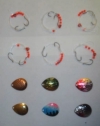
The Finished Product
.
Computer videos showing tying crawler harnesses can be viewed
or downloaded at http://dns.advnet.net/mkg/
or http://www.geocities.com/giamportonem/index.htm
.
The author can be reached at walleyefishingmike@hotmail.com
with any questions you may have about crawler harness construction
or walleye fishing the upper St. Clair River.
For a wide selection and inexpensive crawler harness components,
request catalogs from the following companies:
|
Company
|
Website
|
Strengths
|
| Stamina
1-800-546-8922
|
www.staminainc.com |
Large
selection and quantity price breaks on lure components. |
| Netcraft
1-800-638-2723
|
www.jannsnetcraft.com |
Large
selection and quantity price breaks on components. A lot
of fly tying, net making, including hatchet/tomahawk style
blades. |
| Northland
Tackle
1-800-786-3474
|
www.northlandtackle.com |
Bi-colored
and metal colored peg-floats, other components, and even
fishing tips. |
| Lindy
Little Joe
1-218-829-1714
|
www.lindylittlejoe.com |
Hatchet
blades, No-Snagg® Sinkers, other components. |
| Hagens
1-800-541-4586
|
www.hagensfish.com |
Large
selection, large quantity orders only, bi-color
peg and other floats. |
| BassPro
Shops
1-800-227-7776
|
www.basspro.com |
Not
as many components but just about anything else. |
| Cabelas
1-800-237-4444
|
www.cabelas.com |
Tangle
Free Bottom Bouncers. Not as many components but just
about anything else. |
-
|